
Key takeaways
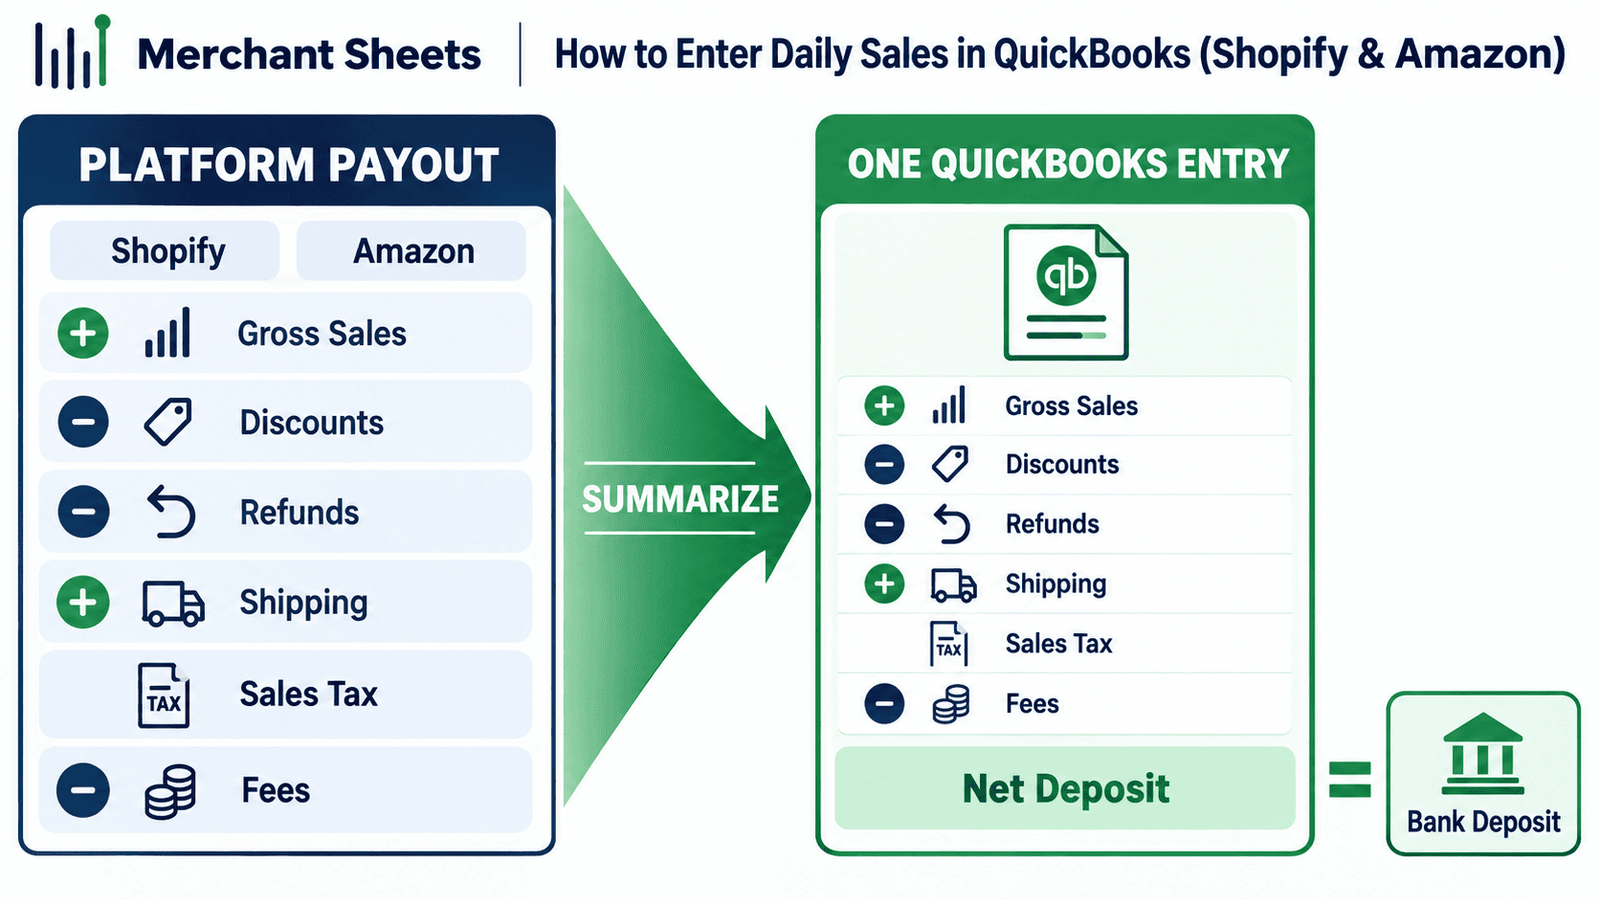
- Recording ecommerce sales means posting one summarized entry that captures gross sales, discounts, refunds, shipping, sales tax collected, and platform fees, and reconciles to the deposit in your bank.
- On Shopify and Amazon you record one entry per payout. The platforms pay you on their own schedule, days after the sale and net of fees, so the entry follows the payout rather than the calendar day.
- Set up a sales income account, a clearing account, sales tax as a liability, and a payment-fee expense once, and every entry after that takes a couple of minutes.
- Two methods post the same result: a summarized sales receipt (item-based and fast) or a summary journal entry from the payout report (flexible, and the working default for most sellers).
- Sales tax you collect is a liability you owe the state, and the platform’s fees are an expense, so the entry grosses revenue back up above the net deposit.
- A payout connector like A2X or Link My Books posts the same entry automatically once manual entry gets frequent or multichannel. As of early 2026, A2X starts around $29 per month.
Your Shopify dashboard shows $5,400 in sales this week, but $5,351 lands in your bank. The number you record in QuickBooks is neither one on its own. Recording ecommerce sales comes down to one summarized entry per payout that captures the sales, the platform’s fees, and the tax you collected, and reconciles to the deposit.
How do you enter daily sales in QuickBooks?
To enter daily sales in QuickBooks Online, you record one summarized transaction for the period, a sales receipt or a journal entry, that captures the totals (gross sales, discounts, refunds, shipping, sales tax collected, and payment fees) instead of each individual order, then post it so it reconciles to the deposit in your bank.
A summarized entry rolls a period’s orders into a single record, and to reconcile is to make that record tie out to the money in your bank. QuickBooks documents this as a daily sales summary, and for a cash-register business you post one at close each day, when the sale and the cash arrive together.
Shopify and Amazon run on a payout cycle instead. The cash reaches your bank days after the sale, net of the platform’s fees, on the platform’s schedule, so one payout can span several days of orders.
For an ecommerce business the entry follows each payout or settlement, and that timing is what keeps your ecommerce books tied to the bank.
| Two rules keep the entry clean: post one entry per payout, and make it equal the net deposit. Record gross sales alone and the books run ahead of the bank by every dollar of fees and tax. |
Set up your accounts and items first
A few accounts, set up once, carry every entry after. You need an income account for sales, a clearing account to hold the payout until the bank deposit clears, a liability account for the sales tax you collect, and an expense account for the platform’s fees.
If you use the sales-receipt method below, you’ll also add a handful of items that map to those accounts.
The clearing account, a bank or cash-on-hand type, is what makes the entry reconcile. The summarized sale posts there first, and when the real deposit shows up in the bank feed you match the two, so the clearing account nets to zero. Sales tax sits in a liability account because it’s money you collected for the state.
The platform’s fees, Shopify Payments or Amazon’s selling fees, go to an expense account, which keeps your revenue reported gross.
Line these up with your chart of accounts rather than adding parallel accounts off to the side, so the entry posts where the rest of your reporting already reads.
Table 1. The accounts to set up once (and the items, if you use the sales-receipt method).
| Account or item | Type | What it captures |
| Daily Sales (customer) | Customer | A single dummy customer used only for summary sales receipts; name it Shopify or Amazon if you keep one per channel |
| Sales income | Income | Gross product sales for the period |
| Shipping income | Income | Shipping charged to customers |
| Sales Tax Payable | Liability (current) | Tax you collected and owe the state; kept out of revenue |
| Merchant / payment fees | Expense | Shopify Payments or Amazon fees taken out of the payout |
| Discounts and refunds | Income (contra) | Discounts applied and refunds issued, reducing revenue |
| Clearing account | Bank / cash on hand | Holds the payout until the real deposit clears, so the entry reconciles to the bank |
Method 1: the summarized sales receipt
The sales-receipt method records each payout as one Sales Receipt to a single Daily Sales customer, with a line for each component. It’s the fastest repeatable option for a clean Shopify payout, and Amazon’s longer list of fees fits the journal-entry method that follows.
- Create the receipt: In QuickBooks Online, select + New, then Sales Receipt, and choose your Daily Sales customer and the payout date.
- Enter gross sales: Add your sales income item for the period’s total product sales as a positive amount.
- Add shipping, subtract discounts and refunds: Enter shipping income as a positive line, and discounts and refunds as negative lines, so revenue nets down correctly.
- Record the sales tax you collected: Add a line mapped to Sales Tax Payable for the tax collected, keeping it out of income.
- Subtract the platform fee: Enter the Shopify Payments or platform fee as a negative line to your merchant-fee expense account.
- Deposit to the clearing account: Set the receipt to deposit into your clearing account, confirm the total equals the net payout, then match it to the bank deposit when it posts.
Method 2: the summary journal entry
The journal-entry method records the same payout as one Journal Entry built from the platform’s payout report. It’s the working default for most sellers because it handles any number of fee and adjustment lines. A journal entry lists debits and credits that have to balance, and here they balance only when the net equals the deposit.
This entry records the sale and its fees. The cost of the goods sold is a separate periodic entry, so it stays out of the daily sales summary.
- Pull the period’s figures: Open the Shopify Finances summary, or the Amazon settlement report, for the payout, and note gross sales, discounts, refunds, shipping, tax collected, and fees.
- Start the entry: Select + New, then Journal Entry, dated to the payout.
- Debit the clearing account: Enter the net deposit as a debit to your clearing account, the cash coming in.
- Credit your income accounts: Credit sales income for gross sales and shipping income for shipping charged.
- Handle tax and reductions: Credit Sales Tax Payable for the tax collected, and debit discounts and refunds as contra-revenue, a reduction of sales.
- Debit fees and confirm it balances: Debit the merchant-fee expense, check that debits equal credits, and match the deposit against the clearing account when it lands.
How to enter Shopify sales in QuickBooks
For Shopify, two reports give you everything: the Finances summary (gross sales, discounts, returns, shipping, taxes, and Shopify Payments fees) and the payout report (the deposit amount). Map each figure to the account from the setup, and the entry balances to the payout.
Shopify Payments pays out net of its transaction fees on a rolling schedule, so the deposit already has fees removed. Your entry adds the fee back as an expense, which keeps revenue gross and the fee visible.
Orders paid through another gateway, PayPal, Shop Pay Installments, or Amazon Pay, settle on their own schedule and get their own entry, which is the usual reason a month’s numbers stop matching.
Gift cards are a liability until redeemed, and tips are their own line, so neither counts as sales.
Setting up Shopify accounting cleanly the first time makes each of these a two-minute repeat. Here’s the same $5,351.15 payout as one balanced entry.
Table 2. A $5,351.15 Shopify payout recorded as one balanced entry (illustrative figures; use your own report totals).
| Account | Debit | Credit |
| Clearing account (net deposit in) | 5,351.15 | |
| Discounts and refunds (contra-revenue) | 400.00 | |
| Merchant fees (Shopify Payments) | 158.85 | |
| Sales income (gross) | 5,400.00 | |
| Shipping income | 150.00 | |
| Sales Tax Payable (collected) | 360.00 | |
| Totals | 5,910.00 | 5,910.00 |
How to enter Amazon sales in QuickBooks
Amazon follows the same shape with more lines. The settlement report bundles product sales, refunds and promotional rebates, referral and fulfillment fees, storage and subscription fees, reimbursements, sometimes advertising, and the sales tax Amazon collects and remits for you.
That report is the single source for all of it, and the net settlement is your deposit.
Amazon settles on roughly a two-week cycle, so one entry covers about two weeks of Amazon bookkeeping. Under marketplace facilitator rules, the state laws that make the marketplace responsible for the tax, Amazon collects and remits sales tax on your behalf, so you record it as collected and cleared in the same entry rather than carrying it as a liability you’ll pay later.
The rest maps to the same accounts as Shopify.
- Product sales and shipping: The revenue lines, credited to sales income and shipping income.
- Refunds and promotional rebates: Reductions of revenue, entered as contra-revenue against sales.
- Selling fees: Referral fees and FBA fulfillment fees, booked to a merchant or selling-fee expense.
- Storage and subscription fees: FBA storage and the Professional selling-plan fee, booked to expense.
- Reimbursements: Amazon’s repayments for lost or damaged inventory, recorded as other income.
- Marketplace facilitator tax: Sales tax Amazon collected and remitted, recorded as collected and cleared so it nets out.
Match the entry to your bank deposit
The entry isn’t finished until it clears the bank feed. When the deposit posts, you match it to the summarized entry waiting in your clearing account, and the clearing account returns to zero.
A matched clearing account is the sign the period is recorded correctly, and a balance left sitting there is the sign something is off.
When the two won’t match, the gap is almost always one of a few things. Work down the list before you touch the numbers, since the fix is usually a missing line, not a wrong total.
- Fees left out: The deposit is net of fees, so revenue recorded gross without a fee line overstates it. Add the merchant-fee expense so the net ties out.
- A second gateway: PayPal or Shop Pay Installments pays out separately, so recording it against the Shopify deposit double-counts. Give each payout its own entry.
- Period-end timing: A payout that straddles month-end sits in the clearing account until the deposit lands, so date the sale to the period it belongs to and let the clearing account hold it across the boundary.
- Rounding: Cent-level differences come from recomputing each line by hand, so reconcile to the report’s own totals rather than your own math.
When should you stop entering sales by hand?
The manual method works while payouts are occasional and single-channel. It stops paying off once you’re multichannel, high-volume, or spending more than a few minutes a week on it, and Amazon settlements cross that line first. At that point a payout connector posts the same entry automatically.
A payout-summary connector such as A2X or Link My Books reads each payout, posts the summarized journal entry mapped to your accounts, and reconciles it to the deposit, without you opening the report. It’s the same per-payout logic from this page, so the accounts you built still do the work while the connector handles the entry.
If you run more than one channel, it also keeps each one reconciling to its own settlement, and the wider set of QuickBooks connectors covers inventory and tax alongside it.
Table 3. Which method to use.
| Method | How it works | Best for |
| Summarized sales receipt | One Sales Receipt per payout, a line per component, item-based | A clean single-channel Shopify payout; the fastest manual option |
| Summary journal entry | One Journal Entry per payout from the payout report, debits and credits | Most sellers; any number of fee and adjustment lines, and Amazon settlements |
| Automate (payout connector) | A2X or Link My Books posts the same entry automatically, reconciled to the deposit | Frequent payouts, multichannel, or high volume, when manual stops paying off |
Frequently asked questions
How do I record Shopify sales in QuickBooks without entering every order?
Record one summarized entry per Shopify payout, a sales receipt or a journal entry that captures gross sales, discounts, refunds, shipping, tax collected, and Shopify Payments fees, and reconcile it to the deposit, rather than importing each order.
Should I enter ecommerce sales daily or per payout?
Per payout. Shopify and Amazon pay out on their own schedule net of fees, so the entry that reconciles to your bank is one summary per payout or settlement, and a single payout can cover several days of orders.
How do I record Shopify Payments fees in QuickBooks?
Book the fee as an expense on its own line so your revenue stays gross. The Shopify deposit already has fees taken out, so the entry adds the fee back as a merchant-fee expense and the net still equals the deposit.
Where do I find the numbers for the entry?
Shopify’s Finances summary report gives sales, discounts, shipping, tax, and fees, and its payout report gives the deposit amount; on Amazon, the settlement report is the single source for every line.
Is the sales tax I collect on Shopify income?
No. Sales tax you collect is a liability you owe the state, recorded to Sales Tax Payable, and only your product and shipping revenue counts as income.
How do I enter Amazon sales when Amazon already paid the sales tax?
Under marketplace facilitator rules, Amazon collects and remits the tax, so you record it as collected and cleared in the same entry rather than carrying it as a liability, while sales, fees, refunds, and reimbursements post as usual.
Can I automate entering daily sales in QuickBooks?
Yes. A payout-summary connector like A2X or Link My Books posts each payout as the same summarized journal entry automatically and reconciles it to the deposit, which is worth it once manual entry gets frequent or multichannel.
